Access
In order to access your Business Banking online, you will need an active MemberCard debit card and online banking password for the business account. This will be used as your login credentials. If you require a new card or need to reset your password, please contact a branch. If this is your first time logging in, please review this information. Since the introduction of Multi-Factor Authentication (MFA) (a mandatory security feature of Vancity online and mobile app banking) the account owner or delegate (Online Business Banking only feature) will need to set up MFA and may be required to enter a one-time code when accessing their Vancity accounts.
Initiate and Approve Transactions
After you have logged into Online Business Banking, you will be able to initiate transactions or approve/modify pending transactions. To do so, follow the steps outlined below.
To add or delete a bill payee, follow the instructions here: How do I add or delete a bill payee?
Transactions can be initiated through online banking and the mobile app. In order to do so, follow the steps below:
- Select the desired transaction from the left-hand toolbar
- Input the necessary information
- Confirm
That transaction will then remain in ‘pending’ status for up to 7 days until an authorized signer has approved it. While in ‘pending’ status, this transaction will not be processed nor impact the balance of the account.
Transactions that have been initiated and require a first or second approval by a signing officer can be located in the ‘Transaction Manager’ section of the ‘Business Services’ tab. To provide the approval for this transaction please follow the steps below:
- From the left-hand menu, click the ‘Business Services‘ tab to launch the ‘Transaction Manager‘.
- Under the ‘Transactions require your approval’ section, locate the transaction you intend to approve.
- Click the ‘Approve‘ button.
- Click the ‘Confirm‘ button.
Note: To view the transaction history, refer to the ‘How do I view transaction history?’ question below.
Pending transactions are viewable in the ‘Transaction Manager’ section. They will be housed in one of two sections:
- Transactions require your approval (please follow steps in “How do I approve a transaction that has already been initiated?” question above to action)
- Transactions require approval from others (these are transactions that you have already initiated /approved and are waiting for approval from another authorized signer of the account)
A transaction stays in pending status for 7 calendar days before it expires. There are no impacts to the balance of the account as pending transactions are not processed until they have been fully approved. After they expire, you can view these transactions under the ‘Transactions rejected, recalled or expired’ section of the ‘Transaction Manager’.
Note: Details of this pending transaction are only able to be viewed through Online Business Banking and are unable to be viewed or serviced by Vancity staff.
To cancel a pending transaction, you will either need to recall it (if you initiated it) or cancel it (if someone else has initiated it)
- From the left-hand menu, click the ‘Business Services‘ tab to launch the ‘Transaction Manager‘.
- If it was a transaction you initiated, locate it under the ‘Transactions require approval from others’ section
OR
If it was a transaction someone else initiated, locate it under the ‘Transactions require your approval’ section. - Click the or ‘Recall‘ or “Cancel‘ button.
- Click the ‘Confirm’ button.
The transaction history will let you know who initiated or approved a transaction and when. To view this information, follow the steps below:
- From the left-hand menu, Click the ‘Business Services‘ tab to launch the ‘Transaction Manager‘.
- Locate the transaction.
- Click the ‘Show history‘ link in the header of the transaction.
Assign and Manage Delegates:
Lighten your workload by creating read-only delegates to view and check your accounts, or initiator delegates to create online transactions for you review and approve. Delegates can access your business account through the desktop site of vancity.com via login credentials that you are able to provide and manage.
There are various levels of authorization for Delegates that are determined and/or modified by the authorized signers of the account.
| Status | Action |
| Read-only | View accounts and manage the following:
|
| Initiator | View accounts and initiate transactions including:
|
Once you have identified a delegate and the level of authorization they require, through the desktop site of vancity.com you will be able to create and manage their profile.
Each authorized signer is able to assign up to three delegates.
Note: Prior to adding a Delegate through Online Business Banking, confirm with the individual that you have their expressed consent to provide their email and/or phone number to receive notification of the login information.
To add a Delegate, follow the steps below:
| Step 1: From the left-hand menu, click the ‘Business Services‘ tab. Click the ‘Delegate Manager‘ sub tab. |  |
| Step 2: Click the ‘Add Delegate’ linkc |  |
| Step 3:
Select the ‘Access Level’ appropriate for your Delegate. Add their information. |
 |
| Step 4: Add their contact information. |  |
| Step 5: Check mark ‘Share accounts under this member card’. Click the ‘Submit’ buttonc |  |
| Step 6: You will receive a receipt confirming your transaction. |  |
The Delegate will subsequently receive two separate emails 15 minutes apart with the login information that you have generated.
If your delegate still can’t log into Online Banking, please reset their password by following the steps in the question below.
A Delegate’s password can only be reset by the authorized signer that created their profile. This reset can only be done through the desktop access of Online Business Banking. To reset a delegate’s password, follow the steps below:
|
|


The Delegate will then receive an email at the address specified in their profile with their password. At the first login, the delegate will be prompted to create a new password.
Delegate profile details can only be amended through Desktop access of Online Business Banking. To amend a Delegate’s details, follow the steps below:
|

|


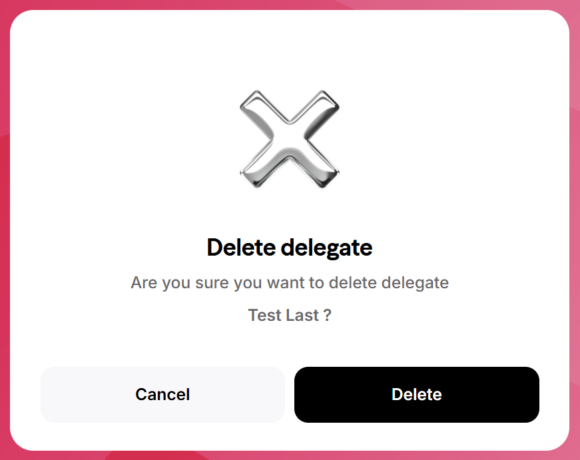
A Delegate can only be removed through Desktop access of Online Business Banking. To remove a Delegate, follow the steps below:
|

|

To update a delegate’s e-mail address, you will need to Edit the delegate.
|
Step 1: On the ‘Delegate Manager’ screen, click on ‘Edit’. |
 |
Step 2: Scroll down and update the delegate’s Email Address. Then re-enter it. Finally, save your changes. |
Access
In order to access your Business Banking online, you will need an active Member Card debit card and online banking password for the business account. This will be used as your login credentials. If you require a new card or need to reset your password, please contact a branch. If this is your first time logging in, please review this information. Since the introduction of Multi-Factor Authentication (MFA) (a mandatory security feature of Vancity online and mobile app banking) the account owner or delegate (Online Business Banking only feature) will need to set up MFA and may be required to enter a one-time code when accessing their Vancity accounts.
Initiate and Approve Transactions
After you have logged into Online Business Banking, you will be able to initiate transactions or approve/modify pending transactions. To do so, follow the steps outlined below.
To add or delete a bill payee, follow the instructions here: How do I add or delete a bill payee?
Transactions can be initiated through online banking and the mobile app. In order to do so, follow the steps below:
- Select the desired transaction from the left-hand toolbar.
- Input the necessary information.
- Confirm.
That transaction will then remain in ‘pending’ status for up to 7 days until an authorized signer has approved it. While in ‘pending’ status, this transaction will not be processed nor impact the balance of the account.
Transactions that have been initiated and require a first or second approval by a signing officer can be located in the ‘Transaction Manager’ section of the ‘Business Services’ tab. To provide the approval for this transaction please follow the steps below:
- From the left-hand menu, click the ‘Business Services‘ tab to launch the ‘Transaction Manager‘.
- Under the ‘Transactions require your approval’ section, locate the transaction you intend to approve.
- Click the ‘Approve‘ button.
- Click the ‘Confirm‘ button.
Note: To view the transaction history, refer to the ‘How do I view transaction history?’ question below.
Pending transactions are viewable in the ‘Transaction Manager’ section. They will be housed in one of two sections:
- Transactions require your approval (please follow steps in “How do I approve a transaction that has already been initiated?” question above to action)
- Transactions require approval from others (these are transactions that you have already initiated /approved and are waiting for approval from another authorized signer of the account)
A transaction stays in pending status for 7 calendar days before it expires. There are no impacts to the balance of the account as pending transactions are not processed until they have been fully approved. After they expire, you can view these transactions under the ‘Transactions rejected, recalled or expired’ section of the ‘Transaction Manager’.
Note: Details of this pending transaction are only able to be viewed through Online Business Banking and are unable to be viewed or serviced by Vancity staff.
To cancel a pending transaction, you will either need to recall it (if you initiated it) or cancel it (if someone else has initiated it)
- From the left-hand menu, click the ‘Business Services‘ tab to launch the ‘Transaction Manager‘.
- If it was a transaction you initiated, locate it under the ‘Transactions require approval from others’ section.
OR
If it was a transaction someone else initiated, locate it under the ‘Transactions require your approval’ section. - Click the or ‘Recall‘ or “Cancel‘ button.
- Click the ‘Confirm’ button.
The transaction history will let you know who initiated or approved a transaction and when. To view this information, follow the steps below:
- From the left-hand menu, click the ‘Business Services‘ tab to launch the ‘Transaction Manager‘.
- Locate the transaction.
- Click the ‘Show history‘ link in the header of the transaction.
Assign and Manage Delegates:
Lighten your workload by creating read-only delegates to view and check your accounts, or initiator delegates to create online transactions for you to review and approve. Delegates can access your business account through the desktop site of vancity.com via login credentials that you are able to provide and manage.
There are various levels of authorization for Delegates that are determined and/or modified by the authorized signers of the account.
| Status | Action |
| Read-only | View accounts and manage the following:
|
| Initiator | view accounts and initiate transactions including:
|
Once you have identified a delegate and the level of authorization they require, through the desktop site of vancity.com you will be able to create and manage their profile.
Each authorized signer is able to assign up to three delegates.
Note: Prior to adding a Delegate through Online Business Banking, confirm with the individual that you have their expressed consent to provide their email and/or phone number to receive notification of the login information.
To add a Delegate, follow the steps below:
| Step 1: From the left-hand menu, click the ‘Business services’ tab. Click the ‘Delegate manager’ sub tab. | 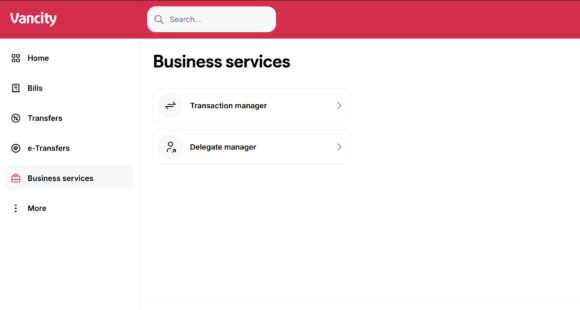 |
| Step 2: Click the ‘Add Delegate’ link. | 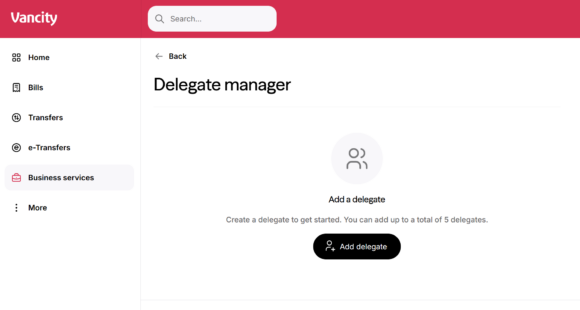 |
| Step 3:
Select the ‘Access level’ appropriate for your Delegate. Add their information. |
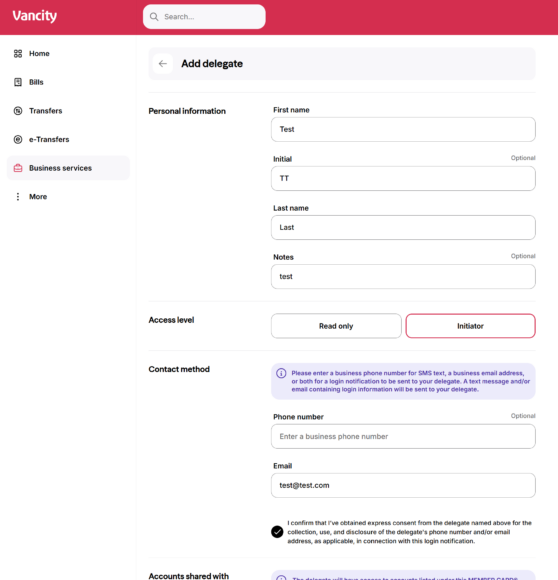 |
| Step 4: Review their information and click ‘Confirm’ when ready. | 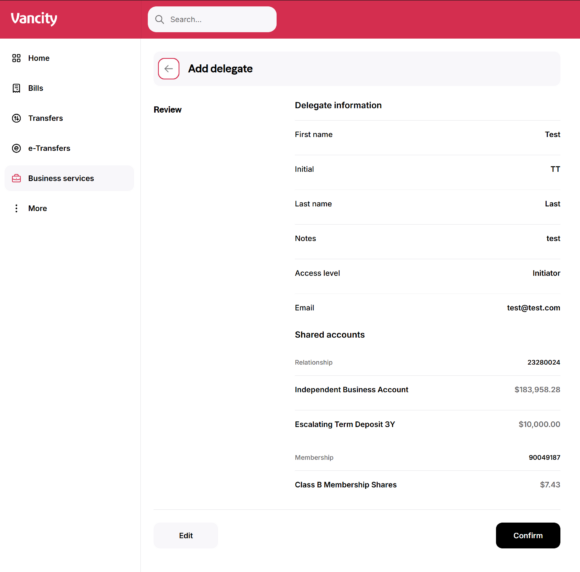 |
| Step 5: A success message indicates a new delegate has been added. |  |
The Delegate will subsequently receive two separate emails 15 minutes apart with the login information that you have generated.
If your delegate still can’t log into Online Banking, please reset their password by following the steps in the question below.
A Delegate’s password can only be reset by the authorized signer who created their profile. This reset can only be done through the desktop access of Online Business Banking. To reset a delegate’s password, follow the steps below:
|
|


The Delegate will then receive an email at the address specified in their profile with their password. At the first login, the delegate will be prompted to create a new password.
Delegate profile details can only be amended through Desktop access of Online Business Banking. To amend a Delegate’s details, follow the steps below:
|

|
A Delegate can only be removed through Desktop access of Online Business Banking. To remove a Delegate, follow the steps below:
|
|
To update a delegate’s email address, you will need to Edit the delegate.
|
Step 1: On the Delegate Manager screen, click on ‘Edit’. |
 |
Step 2: Scroll down and update the delegate’s Email Address. Then re-enter it. Finally, save your changes. |